Server Certificates Update
This menu option enables you to automatically generate custom SSL server certificates for securing connections between OVOC server and client processes. See . for an illustration of these connections.
If you are using self-generated certificates and private key, you can skip to step 4.
|
➢
|
The procedure for server certificates update consists of the following steps: |
|
1.
|
Step 1: Generate Server Private Key. |
|
2.
|
Step 2: Generate Server Certificate Signing Request (CSR). |
|
3.
|
Step 3: Transfer the generated CSR file to your PC and send to CA. |
|
4.
|
Step 4: Transfer certificates files received from CA back to OVOC server. |
|
5.
|
Step 5: Import new certificates on OVOC server. |
|
6.
|
Step 6: Verify the installed Server certificate. |
|
7.
|
Step 7: Verify the installed Root certificate. |
|
➢
|
To generate server certificates: |
|
1.
|
From the Security menu, choose Server Certificates Update, and then press Enter. |
Server Certificate Updates

Information on the currently installed certificate is displayed (the currently installed certificate is the installation default).
|
➢
|
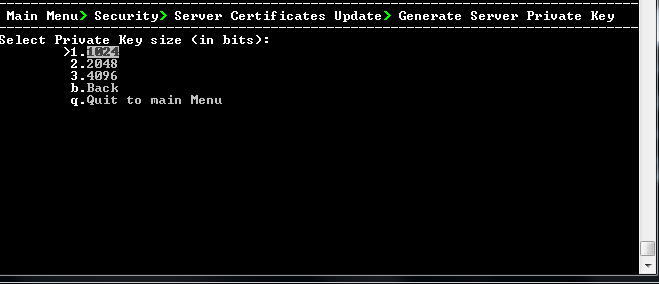
Step 1: Generate a server private key: |
|
1.
|
Select option 1, and then press Enter. The following screen is displayed: |
Generate Server Private Key
|
2.
|
Select the number of bits required for the server private key, and then press Enter. |
|
3.
|
Enter and reenter the server private key password, type y to continue, and then press Enter. |
The private key is generated.
Server Private Key Generated

|
➢
|
Step 2: Generate a CSR for the server: |
|
1.
|
Select option 2, and then press Enter. |
|
2.
|
Enter the private key password (the password that you entered in the procedure above). |
|
3.
|
Enter the Country Name code, state or province, locality, organization name, organization unit name, common name (server host name) and email address. |
|
4.
|
Enter a challenge password and optionally a company name. |
You are notified that a server Certificate Signing Request has successfully been generated and saved to the specified location.
Generating a Server Certificate Signing Request (CSR)

|
➢
|
Step 3: Transfer the CSR file to your PC and send to CA: |
|
■
|
Transfer the CSR file from the /home/acems/server_cert/server.csr directory to your PC and then sent it to the Certificate Authority (CA). For instructions on transferring files, see Transferring Files. |
Transfer CSR File to PC

|
➢
|
Step 4: Transfer server certificates from the CA: |
|
■
|
Transfer the files that you received from the CA to the /home/acems/server_certs directory. The root certificate should have the name root.crt and that the server certificate should have the name server.crt. If you received intermediate certificates, then rename them to ca1.crt and ca2.crt. Make sure that all certificates are in PEM format.
For instructions on transferring files, see Transferring Files. |
If your certificates are self-generated (you did not perform steps 1-3), the /home/acems/server_certs directory does not exist; therefore you must create it using the following commands:
|
●
|
mkdir /home/acems/server_certs |
|
●
|
chmod 777 /home/acems/server_certs |
|
➢
|
Step 5: Import certificates: |
|
■
|
Select option 3, press Enter and then follow the prompts. The certificate files are installed. |
|
●
|
The root certificate should be named root.crt and that the server certificate should be named server.crt. If you received intermediate certificates then rename them to ca1.crt and ca2.crt. |
-----BEGIN CERTIFICATE-----MIIBuTCCASKgAwIBAgIFAKKlMbgwDQYJKoZIhvcNAQEFBQAwFzEVMBMGA1UEAxMM
RU1TIFJPT1QgQ0EyMB4XDTE1MDUwMzA4NTE0MFoXDTI1MDUwMzA4NTE0MFowKjET
Tl6vqn5I27Oq/24KbY9q6EK2Yc3K2EAadL2IF1jnb+yvREuewprOz6TEEuxNJol0
L6V8lzUYOfHrEiq/6g==--
---END CERTIFICATE-----
|
➢
|
Step 6: Verify the installed server certificate: |
|
■
|
Select option 4 ,and then press Enter. The installed server certificate is displayed: |
Installed Server Certificate

|
➢
|
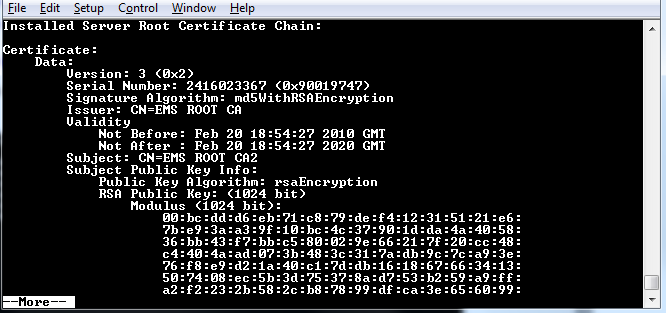
Step 7: Verify the installed root certificate: |
|
■
|
Select Option 5, and then press Enter. The installed root certificate is displayed: |
Installed Root Certificate
|
➢
|
Step 8: Install device certificates and perform supplementary procedures |